1.4.2. How is Anti-Aliasing realized?
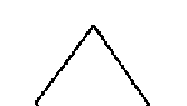
When you look at the next picture you see the staircase effect as the result of the contrast between black and white pixels.
To soften this effect, we can use intermediate grey values for some pixels. But which pixels do we have to choose and what grey value do we have to assign the pixel?
For this purpose we think of any line as a rectangle of a desired thickness covering a portion of grid, as shown in the next image:
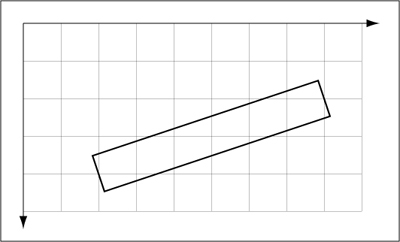
We now colour each pixel that intersects with the rectangle in a shade of grey. Its brightness is proportional to the area of the intersection. A fully covered pixel is still set to black. Pixels not intersected by the rectangle are completely white.
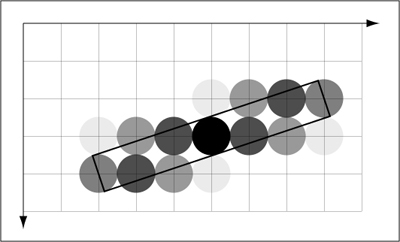
"The number of pixels that are no
longer white is greater than before, but if we take the grey pixels and
multiply the area of each one by the value used to colour it, the total
amount of greyness, as it were, is the same as that produced by only using a
single black level to colour the original collection of
pixels." (CHAPMAN et al. 2000, p. 91)
This technique softens the harsh of
a line. The blurring makes a line look better at a distance. See pictures:
| without Anti-Aliasing |
 with Anti-Aliasing with Anti-Aliasing |
") without Anti-Aliasing (zoomed) without Anti-Aliasing (zoomed) |
") with Anti-Aliasing (zoomed) with Anti-Aliasing (zoomed) |
Anti-Aliasing can not only be applied to black and white pictures but
also to coloured pictures. In this case we have to vary the transparency of the
intersecting pixels instead of the grey values.
If you
want to know more about anti-aliasing have a look at the pages 132-140 of
(FOLEY et al. 1996).
Update: 26.1.2012 (eLML) - Contact - Print (PDF) - © CartouCHe 2004-2007 (Creative Commons)
- layout based on YAML![]()